#3.14 Pseudo Selectors part One (08:57)
더보기

개괄
pseudo selector
1. last-child{} // 마지막 자신 선택
2. first-child{} // 첫번째 자식 선택
3.nth-child(숫자) {} // 원하는 순서의 자식 선택
4.nth-child(even,odd) {} // 짝수or홀수 자식 선택
5.nth-child(2n+1)
- 선택자의 2n+1 요소 선택
- n은 0부터 대입하는 것으로 추측
도큐
https://developer.mozilla.org/en-US/docs/Web/CSS/Pseudo-classes
Pseudo-classes - CSS: Cascading Style Sheets | MDN
A CSS pseudo-class is a keyword added to a selector that specifies a special state of the selected element(s). For example, the pseudo-class :hover can be used to select a button when a user's pointer hovers over the button and this selected button can the
developer.mozilla.org
실습코드
<!DOCTYPE html>
<html lang="en">
  <head>
    <meta charset="UTF-8" />
    <meta http-equiv="X-UA-Compatible" content="IE=edge" />
    <meta name="viewport" content="width=device-width, initial-scale=1.0" />
    <title>Document</title>
    <style>
      body {
        height: 1000vh;
        margin: 50px;
        display: flex;
      }
      div {
        margin-right: 1px;
        width: 150px;
        height: 150px;
        background-color: wheat;
      }

      div:first-child,
      div:nth-child(3) {
        background-color: teal;
      }
      div:nth-child(2n) {
        background-color: tomato;
      }
    </style>
  </head>
  <body>
    <div>first-child</div>
    <div>2</div>
    <div>nth-child(3)</div>
    <div>4</div>
    <div>5</div>
    <div>6</div>
    <div>7</div>
    <div>8</div>
    <div>9</div>
  </body>
</html>
#3.15 Combinators (08:46) : " " > + ~ : 범위 설정
더보기


개괄
Combinaton

1) div의 밑 모든 자식(span) 선택
	div span {
		text-decoration : underline;
	}

2) > : 바로 밑 하나 자식(span) 선택
	div > span {
		text-decoration : underline;
	}

3) + : 바로 아래 형제(span) 하나 선택
    p + span {
  	  color: black;
    }

4) ~ : 아래 형제(span) 모두 선택
p +span : p의 바로 아래있는 형제 span 선택
p ~span : p와 아래의 형제 span 모두 선택


※ > 를 사용하면 direct child를 찾고, + 를 사용하면 바로 코드상 밑에 있는 sibling을 찾게된다.
실습코드
<!DOCTYPE html>
<html lang="en">
  <head>
    <meta charset="UTF-8" />
    <meta http-equiv="X-UA-Compatible" content="IE=edge" />
    <meta name="viewport" content="width=device-width, initial-scale=1.0" />
    <title>Document</title>
    <style>
      body {
        height: 1000vh;
        margin: 50px;
      }
      span {
        color: tomato;
        text-decoration: underline;
      }
      /* 바로 밑의 자식 하나만 */
      div > span {
        background-color: yellowgreen;
        padding: 10px;
      }
      /* 밑의 자식 모두 */
      p span {
        color: teal;
        font-weight: 1000;
        text-decoration: none;
      }
      /* p의 바로 뒤에 있는 형제 span */
      p + span {
        border: 1px solid black;
      }
      /* p의 뒤에 있는 형제 span 모두 */
      p ~ span {
        border: 1px solid black;
      }
    </style>
  </head>
  <body>
    <div>
      <span>span : 바로 밑의 자식 하나만 </span>
      <p>
        p : 누구나가 그러하듯이.......<span>p span : 밑의 자식 모두</span>
        <span>p span : 밑의 자식 모두</span>
      </p>
      <span>p + span : p의 뒤에 있는 span </span>
    </div>
  </body>
</html>
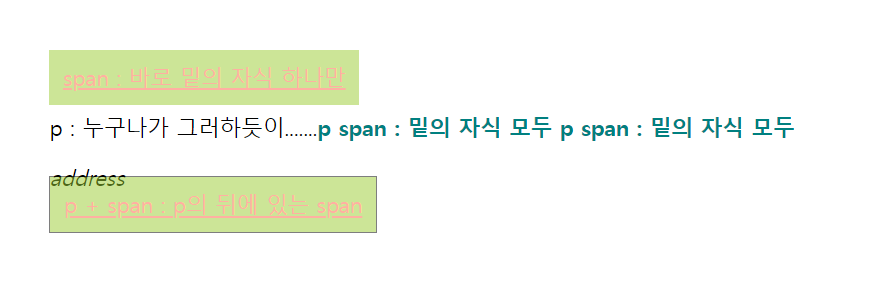
p ~ span 추가한 경우

#3.16 Pseudo Selectors part Two (08:08) : Attribute of Tag
더보기

개괄
- Attribute selectors 특성 선택자
- 그냥 input과 required input이 있다면, input:required{}를 통해서, required input에만 속성을 적용시킬 수 있다.
- input{} 을 통해, [input 이름]에 해당하는 input 속성을 따로 줄 수 있다.
- 여기서, input[placeholder="First name"]은 First name에만 속성을 주지만, input[placeholder~="name"]은 name이 들어가는 모든 input에 속성을 부여할 수 있다.
- "~="은 name을 포함하고 있다는 의미가 되는 것이다.
- a[href$=".org"] → "$="는 ".org"로 끝나는 모든 anchor를 선택할 수 있다.
- attribute selectors를 이용하면, class를 지정할 필요 없이 CSS만으로 각각의 속성을 부여해줄 수 있다.

------------------------------------------------------------------------------

(attribute sellectors)
tag[attribute = "vallue"] : 속성의 값이 "vallue"인 태그를 모두적용
tag[attribute ~= "vallue"] : 앞뒤에 공백이 있는 상태에서 "vallue" 값을 포함한 모든 tag 적용
tag[attribute *= "vallue"] : 앞뒤 공백 상관없이 "vallue" 값을 포함한 모든 tag 적용
그외
tag: required {} required 속성을 가지고있는tag
(필수적인)
tag: optional {} required 속성이 없는
(자유로운,선택적인)
이상 추측
* tag : a, input, form...

*= "hello" 라고 하면 ㅁㄴㅇㄹㄴㅇㄹhelloㅁㄴㅇㄹㄴㅇㄹ 라고 줘도 선택되고요.
~= "hello" 라고 하면 앞뒤에 공백이 있는 상태에서 hello 인 경우만 선택되요.
도큐
https://developer.mozilla.org/en-US/docs/Web/CSS/Attribute_selectors
Attribute selectors - CSS: Cascading Style Sheets | MDN
The CSS attribute selector matches elements based on the presence or value of a given attribute.
developer.mozilla.org
실습사이트
CSS Diner
A fun game to help you learn and practice CSS selectors.
flukeout.github.io
실습코드
<!DOCTYPE html>
<html lang="en">
  <head>
    <meta charset="UTF-8" />
    <meta http-equiv="X-UA-Compatible" content="IE=edge" />
    <meta name="viewport" content="width=device-width, initial-scale=1.0" />
    <title>Document</title>
    <style>
      body {
        height: 1000vh;
        margin: 50px;
      }
      /* optional or required이냐에 따라서 선택 가능 */
      input:optional {
        border: 2px solid teal;
      }
      input:required {
        border: 2px solid tomato;
      }

      /* type을 통해서도 선택 가능 */
      input[type="password"] {
        background-color: aqua;
      }
      input[placeholder="username"] {
        background-color: beige;
      }

      /* type의 범위 유효범위를 설정하여 선택 */
      input[placeholder~="name"] {
        padding: 5px;
      }
    </style>
  </head>
  <body>
    <div>
      <form>
        <input type="text" placeholder="username" />
        <input type="password" required placeholder="password" />
        <input type="text" placeholder="first name" />
        <input type="text" placeholder="last name" />
      </form>
    </div>
  </body>
</html>